Using the plugins
OG Sound Remaster needs nothing from you; it has no settings by design. Ungodly GFX has 210, and two ideas explain most of them. Learn trim versus seize and the HUD rule, and the rest is just sliders.
01 The one thing worth understanding: trim vs seize
Deadly Dozen runs Gaia's global weather controller. Every single frame, it rewrites fog colour, fog density, fog distances, sun colour and intensity, ambient sky, equator and ground colour, ambient intensity, skybox exposure, atmosphere thickness, wind speed, bloom intensity, vignette intensity, colour filter, temperature and tint — all driven from animation curves keyed to time of day and current weather.
That is a hard problem for a graphics mod. Write a value into one of those channels and it is gone before the next frame draws. Write it every frame and you have destroyed the day/night cycle and made storms look identical to clear noon.
So every weather-driven channel here has two modes.
| Mode | What it does |
|---|---|
| TRIM the default | Your value is a multiplier on whatever the weather system just produced. Set fog density trim to 0.5 and fog is always half as thick as the game intended — clear days stay clear, storms still roll in, day and night still work, and you can see. This is what you want almost all of the time. |
| SEIZE per-channel toggle | The plugin takes hard control of that one channel and tells the weather controller to stop writing it. Your value is absolute and permanent regardless of conditions. Use it when you want one deliberate look — cinematic screenshots, or competitive visibility you refuse to let a storm take away. |
The two are per-channel and independent. Seize fog for visibility while leaving bloom, sun and ambient on trim, and the world still breathes. The channels with a seize toggle are:
Color · Bloom · Vignette · Sun ·
Ambient · Skybox · Fog · Wind
02 The window
F7 opens and closes it. 22 tabs down the left, a scrollbar and mouse wheel on the right, draggable by the title bar, and it sizes itself to your resolution — the tab column shrinks automatically so all 22 stay reachable from 4K down to 1024 × 600.
Every setting carries a plain-English explanation of what it does, what it costs, and what it looks like when you move it. It is the same text as the config file comments, so you never have to keep two references straight.
The buttons
| Button | What it does |
|---|---|
| Save | Writes the current state to com.stixsworldhd.ungodlygfx.cfg. Do this before you quit or your session's tuning is lost. |
| Reload | Re-reads the config from disk, discarding unsaved changes. Useful after editing the file in a text editor with the game running. |
| Log Report | Dumps everything the plugin has found to the console — pipeline assets, cameras, volume profiles, HBAO settings, terrains, water, weather controller. Start here when something is not working. |
| Reset Trims | Returns every trim channel to 1.0 — that is, back to exactly what the weather system wants. The fastest undo when you have overcooked something. |
| Rescan | Re-walks the scene graph immediately instead of waiting for the 3-second interval. Press this after every mission load. |
03 The HUD tab and the rule that catches everyone
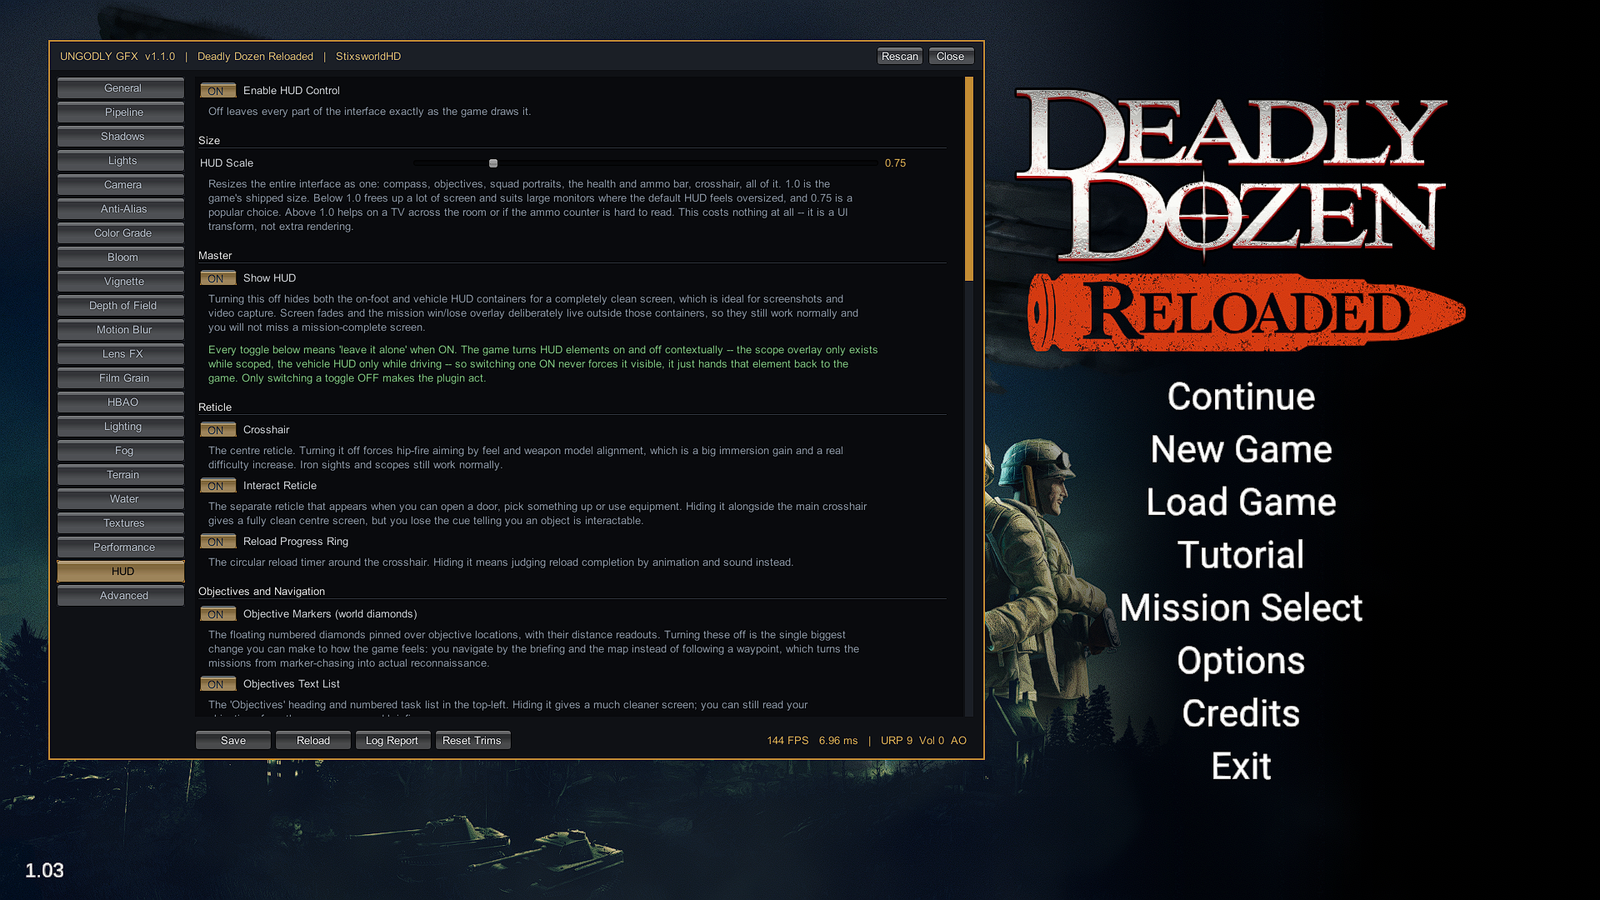 View at 1920×1080
The HUD tab is the newest part of the plugin and the one people misread. There is one rule, and it is the opposite of what a toggle usually means:
HUD Scale resizes the entire interface as one — compass, objectives, squad
portraits, health and ammo bar, crosshair. 1.0 is the shipped size. Below 1.0 frees
up a lot of screen and suits large monitors where the default feels oversized; 0.75,
as in Plate 07, is a popular choice. Above 1.0 helps on a TV across the room. It costs nothing at
all — it is a UI transform, not extra rendering.
The master toggle hides the on-foot and vehicle HUD containers for a completely clean screen. Screen fades and the mission win/lose overlay deliberately live outside those containers, so they still work — you will not miss a mission-complete screen.
04 Five starting points
Rather than starting from 210 defaults, start from one of these and adjust. They are the plugin author's own presets.
Make it look modern
ACES tonemapping        post exposure   +0.4
contrast          +15   saturation      -12
bloom trim        0.6   vignette trim   0.5
mip map bias    -0.75   shadow distance  350
HBAO quality High, multibounce on
render scale     1.25
I need frames
render scale      0.8   MSAA              off
SMAA              low   shadow distance   100
cascades            2   sun shadow map   1024
additional light shadows off
HBAO half resolution, quality Low, max distance 80
water skybox-only on    grass distance     50
disable the game's auto depth of field
Immersive, no-HUD run
objective markers off   objectives list   off
enemy indicators  off   damage arrows     off
crosshair         off   ammo counter      off
compass           off

Keep awareness arrows on so stealth stays readable,
and keep squad portraits so you can read your squad.
I need to see enemies
fog density trim  0.35  fog start/end trim  2.0
vignette trim        0   ambient trim        1.4
sun shadow strength 0.8  shadows lift      +0.03
grass density      0.5   bloom trim          0.5
Cinematic screenshots
Seize colour, bloom, sun, ambient and skybox
ACES tonemapping        DoF Bokeh at f/2.8
film grain       0.15   chromatic aberration 0.08
render scale      2.0   HBAO Max with colour bleeding
05 What the plugin costs you
Effectively nothing, and that is a design decision rather than an accident:
- Scene discovery walks the scene graph on a 3-second interval, not per frame.
- Setting application runs on a 0.25-second interval, not per frame.
- Only two things run every frame, and only because they must: camera FOV, because the game rewrites it each frame for aiming and sprinting, and the trim/seize pass, which has to land after the weather controller's own update.
- Post-processing references are resolved once per interval into cached lists — no per-frame lookups, no per-frame allocation.
- The anisotropic-filtering and mip-bias pass walks every loaded texture, so it only runs when one of those two values actually changes.
ApplyInterval in the General tab controls the 0.25-second figure. Lower it to
0.1 only if you can see values drifting during heavy storms; it is invisible to the
eye at the default and essentially free.
06 Reading the config file instead
Everything in the window is in BepInEx\config\com.stixsworldhd.ungodlygfx.cfg, in 22
sections matching the tabs, with a documentation comment above every single line. If you already
know what you want, editing text is faster than hunting through tabs.
[01 - General]

## MIN 0.02  MAX 2.0 (seconds). How often the plugin re-asserts settings that
## the game's weather system overwrites every frame. Lower = tighter grip but
## slightly more CPU. 0.25 is invisible to the eye and essentially free. Only
## go below 0.1 if you see values drifting during heavy storms.
# Setting type: Single
# Default value: 0.25
# Acceptable value range: From 0.02 to 2
ApplyInterval = 0.25
Edit with the game closed, or edit with it running and press Reload in the window. Do not do both at once — the window's Save will overwrite your text edits.